Posts

Showing posts from May 10, 2014

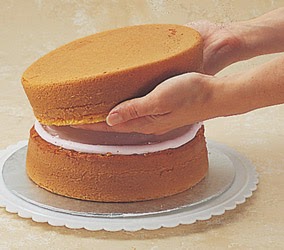
Filling Cake Layers

Image
For a classic round or rectangular cake, you may want to put two leveled cakes together, joined with your favorite filling. This adds height and drama to your design. It's easy to do! step 1 Fill a decorating bag with medium consistency icing and use tip 12 or use the coupler without adding a tip. Start with the bottom layer, leveled side up. Create a dam or circle of icing just inside the edge of the cake. This will prevent any filling from seeping out when the next layer is added. Squeeze a circle about 3/4 in. high and 1/4 in. from the outside edge of the cake. step 2 Fill the center with icing, fruit filling or pudding. step 3 Place the next layer on top, making sure it is level. The weight of the layer will cause the circle of icing to expand just right. Place the top layer, leveled side down, so the top of the cake is perfectly smooth and level.

Icing Color Chart

When mixing color always mix a small amount of color to experiment. Start with base color and then add very small amounts of secondary color. Be sure to mix enough color for the cakes to be decorated as it is difficult to match an exact color. ANTIQUE GOLD:  Add just an extremely small touch of Leaf Green to Golden Yellow AQUA:    Sky Blue and Leaf Green AVOCADO:   Use Moss Green color BLACK:   Our paste color or Royal Blue, Christmas Red, Orange and Lemon CHARTREUSE:    parts Lemon Yellow, 1 part Leaf Green CORAL:    Creamy peach and a touch of pink or orange and a touch of pink. FLESH:    Add just an extremely small touch of Copper to white icing. Ivory can also be used. Light pink with a small amount of brown. GRAY:    Add just a touch of Black to white icing. HUNTER GREEN:   Kelly Green and a touch of Black JADE:    Leaf green, Royal Blue and a touch of Black LAVENDER:   Pink...

Easy Buttercream Technique

Image
Swirl Drop Flowers Drop flowers are a great way to add flowers quickly. Pipe drop flowers in buttercream directly on your cake, or pipe in royal in advance and place your flowers anywhere. Flowers will be sharper in definition when piped in royal.                              E-Motion E-Motion works best for bottom borders or western lariats. If you need to change positions while piping a border, push in tip at the end of the “e” and continue for a smooth look. Roses Create this magnificant rose—the most popular icing flower of them all. With practice, your roses will have the just-picked look of real fresh garden roses! Shell The Shell is the most popular icing technique of all. It’s the basis for many borders, fleurs de lis and more. Lift the tip only slightly when piping to avoid a bumpy look. Sotas The lacy texture of Sotas looks great on borders, ou...

How to Choose and Use Decorating Bags

Image
Push the coupler base up into the bag so that you can cut an opening at the mark. Decorating bags hold the icing and decorating tip so you can create a variety of decorations. In this class, you'll be using three types of bags: Featherweight, Disposable and Parchment.  Featherweight Bags are reusable, made of flexible, coated polyester. They are strong, lightweight and dishwasher safe, in sizes from 8 in. to 18 in. Disposable Bags are made to use and toss—no fuss, no muss. Made of strong, flexible plastic, they're easy to handle. Available in 12, 24, 50 and 100 count boxes. Parchment Triangles are easy to fold into a convenient "throw-away" bag. Made of grease-resistant vegetable parchment paper, available in 12 in. and 15 in. sizes. The Coupler, and How It Works Using a two-part device called a coupler lets you interchange several decorating tips without changing the bag. The two parts of the coupler are the base and the ring. The base...

Icing Cakes

Image
Preparing a perfectly smooth iced cake, while keeping crumbs out of the icing can seem like a tricky thing–but over the years we've developed some methods to make it easier. Start by positioning the cake on its serving board on the turntable. Remember to thin the icing with 3-4 Tablespoons of corn syrup so it spreads easier. The trick to keeping crumbs out of your icing is to glide your spatula over the icing, never allowing the spatula to touch the cake surface or to pull already spread icing from the cake surface. Steps step 1 Trim a 16 in. Featherweight bag to fit tip. Fill bag half full with icing. Hold bag at 45° angle and lightly press tip against cake. Squeeze a ribbon of icing in a continuous spiral motion to cover cake top, with last ribbon forcing icing over edge of cake top. step 2 To ice the sides, squeeze icing as you turn the cake slowly. Repeat the process until the entire cake side is covered. step 3 Rotate the cake slightly and ...

Icing Consistency

Image
If the consistency of your icing is not right, your decorations will not be right either. Just a few drops of liquid can make a great deal of difference in your decorating results. Many factors can affect your icing consistency, such as humidity, temperature, ingredients and equipment. You may need to try using different icing consistencies when decorating to determine what works for you. As a general guideline, if you are having trouble creating the decorations you want and you feel your icing is too thin, add a little more confectioners' sugar; if you feel your icing is too thick, add a little more liquid. In royal icing recipes, if adding more than 1/2 cup confectioners' sugar to thicken icing, also add 1-2 additional teaspoons of Meringue Powder. Options option 1: stiff icing Stiff icing is used for decorations such as flowers with upright petals, like roses, carnations and sweet peas. Stiff icing also creates your figure piping and stringwor...