How to make and fill piping bags

Piping is one of the prettiest ways to decorate cakes, and is really an art form in its own right. Piping bags are used for decorating and icing the cake. Disposable piping bags are readily available. They can also be made of canvas with a plastic lining or with butter paper.
Preparation Time: 5 mins Makes 1 piping bag
Ingredients
grease proof paper
scissors
Nozzles
Icing used
Method
Cut a 250 mm. (10”) square out of grease-proof paper. Use a smaller size if you need it for less icing. Use a smaller size if you need it for less icing.

Fold in half diagonally to form a triangle.

Working with the long side facing away from you, pull one corner into the centre.

Hold in place while bending in the other corner and wrapping tightly to form a cone shape.

Tuck upstanding ends inside the paper cone and fold down to secure. Spoon the melted chocolate into the bag. Fold down the bag to seal. Snip off the tip gently and apply pressure to pipe out contents. Practice will make you perfect.

How to fill a piping bag
The end of your bag needs to be measured and cut to fit the nozzle. Drop the cone shaped base, narrow end down, into the pastry bag, forcing it as far as it will go. The piping bag is ready to use.


Now, you need a tall glass or narrow bowl to hold the bag while filling and to place the filled pastry bag when not in use. An empty pringle's potato chip can works well too.
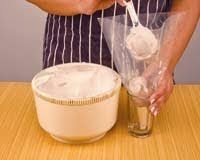
Once you have that, drop the bag into the glass or can, drape the top of the bag over the rim, as it will keep it open for you while you fill it. Also, place bag, tip side down, in the glass or can when not in use.


Comments
Post a Comment